Saturday 30 November 2013

Creating IFM media for SERVER 2012 R2

Today we will be looking at creating an install media for Server 2012 R2 this will be used when downloading and installing ADDS, this media will help speed up the process as it has all the information from the previous ADDS server.

Here is how it is done:

Firstly go to my computer and on the C drive create a folder, in my case i called the folder ifmbackup.


After we have created our backup folder on the C drive, open CMD or command prompt. Once you have opened CMD type ntdsutil. This will open the ntds shell.


Once this is complete and you you are directed to the ntdsutil: you will want to type in activate instance ntds.


Now once the ntds has been activated and is ready, type ifm, this will direct you to the ifm shell.

once the ifm shell has opened we can begin to type in the command to back up our settings.


You will want to type: create full c:\ifmbackup , this will direct out backup to the folder we have created on the C drive. hit enter and the magic will happen!


Once you have hit enter the backup process will start, once it has completed a message will be displayed on the screen: IFM media created successfully in c:\ifmbackup.

Your media is now ready, keep this media backed up to a thumb drive or a NAS for future use.

Enjoy!


Wednesday 27 November 2013

Creating an organizational unit in active directory users and computers SERVER 2012 R2

We have previously created a USER a GROUP and successfully added out USER the our GROUP, we will now be looking at creating a new organizational unit. An OU is used for exactly what you may think, keeping things organized withing you active directory.

Lets begin.

Navigate to you SERVER MANAGER


Select AD DS and click on you server selecting active directory users and computers.

You will now be presented with the AD UC wizard.


Here you will want to right click on your domain and click NEW followed by ORGANIZATIONAL UNIT.


The window that has appeared will required your OU name, type in the appropriate name and select PROTECT CONTAINER FROM ACCIDENTAL DELETION, i recommend doing this to avoid hours of lost work depending on the size of your organization. 

When done click OK


Our OU has now been created!

Enjoy!

Creating a new organizational group SERVER 2012 R2

In the previous post we looked at creating a new user, we will now be adding our new user to a group. Groups help you delegate rights to certain users and restrict others.

For example a user that is part of the managers group will have more rights than a user that is part of the finance group.

Lets look at creating a group and adding our user to it.

Start by navigating to the AD UC option in the drop down.


Once the window has opened we can now create a new group.


Just like before select you domain and select USERS from the drop down.

Here you can right click on the open space and select NEW then GROUP.


You will then be prompted to select your options and name your group.

The DOMAIN LOCAL group is a security group that can contain accounts from any domain in the forest. You can give domain local security groups rights and permissions to resources that are only in the same domain where the domain local group is located.

The GLOBAL group can be used in its own domain, in member servers and in workstations of the domain. You can give a global group rights and permissions but a global group can only contain user accounts that are from its own domain.

The UNIVERSAL GROUP contains users, groups, and computers from any domain in its forest as members. Also you can give the universal group rights and permissions on resources in any domain in the forest.

now choose a group scope and select the group type.

SECURITY GROUPS provide an efficient way to assign access to resources on your network.

DISTRIBUTION GROUPS can be used only with e-mail applications such as MS Exchange to send e-mail to groups of users. Distribution groups do not have security-enabled. VERY IMPORTANT: If you need a group to have access to shared resources, create a security group.

Now after you have made your selections and named your group you may click ok to create it.


Our group is now created.

In order to make our user a member of this group you will want to select your user and right click on it selecting ADD TO A GROUP.


You will then be prompted to select the group you would like to add your user to from your domain. type in the name and select check names, the server will automatically find and make sure the typed group is correct.


 As soon as the group has been checked select OK.


Then OK again. we have now successfully added out user to the specialists group.

Enjoy!

Creating a new user in active directory users and computers SERVER 2012 R2

If you have been following my previous posts i have shown you how to install AD DS, DHCP Server, DNS server and much more.

If you have installed and configured you active directory server you can now add users! how exciting.

Here is how we do it!

Head over to your SERVER MANAGER and navigate to ACTIVE DIRECTORY USERS AND COMPUTERS.


Once the AD UC window has popped up double click on your domain name to activate the drop down, here you will want to click on the USERS TAB in order to display all the current users.

Right click on the open space and select NEW then navigate to USER


You will then be prompted to enter your user information, here i suggest planning how your users will be logging on, for example i like to use first initial and last name as their username, and click NEXT.


Soon as you have finished setting up your user information, you can configure you PASSWORD and PASSWORD PREFERENCES.


The selections explain themselves. You can select whatever option you would like, there is also the option to disable the account, the reason you would like to do this is for example there may be a temp worker starting soon, or you may have a temp locked down account that you use for training, or other purposes.


Enjoy!

Delete and recover a user in active directory after enabling the recycle bin server 2012 R2

In my previous post i enabled the active directory recycling bin which is our safety net from losing accidentally deleted users.

I will now show you how to go about deleting and recovering a user.

Firstly head over to your server manager and select you server.

Right click and select active directory users and computers.


Once you have done this you will be presented with the active directory users and computers window.


Here you will select the user or users you would like to delete and right click on them selecting delete from the drop down. you will then be prompted to confirm, now at this point all the click happy people will select YES without reading and oh no my user has been deleted :(

Fear not as we have enabled the recycling bin and it has been stored there waiting to be restored.

Now lets restore our deleted users, in order to restore a deleted user you must exit the active directory window and head back to you server manager.

Now select tools at the to right hand side and select ACTIVE DIRECTORY ADMINISTRATIVE CENTER.


Once you have selected the above, the active directory administrative center will appear. 


 Here select your domain in this case mine is called startrun and scroll down to DELETED OBJECTS.

Double click on DELETED OBJECTS and you will be directed to the recycling bin.


In the recycling bin you will have a list of all deleted accounts, select the account you would like to restore and right click on it. Now you can either restore it or restore this user to a certain folder in you directory.

If you select restore too you will be prompted to choose the folder you would like to restore this user too. this makes things so easy.


Once you have selected the folder you would like click ok and your user will be restored there.

Now to test go back to your ACTIVE DIRECTORY USERS AND COMPUTERS and select the folder you have chosen to restore too, your user should now be back.


Enjoy.

Enabling active directory recycling bin in server 2012 R2

Many users are not aware that active directory users and computers actually has a recycling bin. This feature is to aid in accidental deletion of a user in your active directory. An important thing to remember is that once this recycling bin is enables, it can never be disabled and will always keep deleted users.

There are some advantages to this, one being in a large corporate setting if you delete a user because they left the company, all is not lost and  if they ever return or you need some information from this user you can just go in and recover it.

Lets try it out.

You will want to start but going to SERVER MANAGER and select Active directory administrative center.


 Once active directory administrative center has popped up select your domain, in this case mine is called startrun, and navigate to the left middle section selecting ENABLE RECYCLE BIN.


Enjoy!

Sunday 24 November 2013

Activating and deactivating a Global Catalog on Server 2012 R2

Just wanted to show you how to quickly activate or deactivate the Global Catalog on your server.

Firstly you will navigate to your SERVER MANAGE and access you AD DS.


Select you server and right click in order to access the list of AD DS features.

Once you are on this List navigate to ACTIVE DIRECTORY SITES AND SERVICES and click.


now you will be presented with your AD SS wizard, here you wil want to drop down until you arrive at your servers and see NTDS SETTINGS.


Here you will want to right click and select properties. In addition you can enable or disable the global catalog this way on all the servers as they will be populated here if they are a member of the same domain.


After you have selected properties you will have NTDS settings properties window appear here you can select to enable or disable the Global Catalog, the way you do this is by checking the box to enable or uncheck the box to disable and click apply.

That's all there is to it. Enjoy!


Adding a seperate domain controller on server 2012 to a domain

Configuring a separate domain controller on a domain has many benefits, some of these benefits include load balancing, when one domain controller is getting to overwhelmed there is always the option of adding a second domain controller a separate server that can communicate and share information with the primary domain. And this is what i will be showing you how to do today.

Firstly you must check your NIC (network interface card settings) it is recommended that you have a static ip address assigned to your NIC along with the current DNS SERVER address. Here you may see how to check NIC settings: http://todaysittips.blogspot.ca/2013/11/discover-your-current-nic-network.html

Secondly you will want to connect your new server to you current DOMAIN if you do not currently have it connected. This is how to connect to your current domain: http://todaysittips.blogspot.ca/2013/11/connecting-windows-server-2012-r2-to.html

Now after we have done the above we need to install AD DS and DNS server on the server you will to set up the domain controller on.

My previous blog shows how this is done through add roles and features.
http://todaysittips.blogspot.ca/2013/11/installing-ad-ds-active-directory.html

Once you have installed AD DS and the DNS server you will want to navigate to you SERVER MANAGER and click MORE at the top right hand corner under tasks.


You will now be directed to the ALL SERVERS TASK DETAILS, here the post deployment config can be accessed.


Click on promote this server to a domain in order to begin the configuration process.


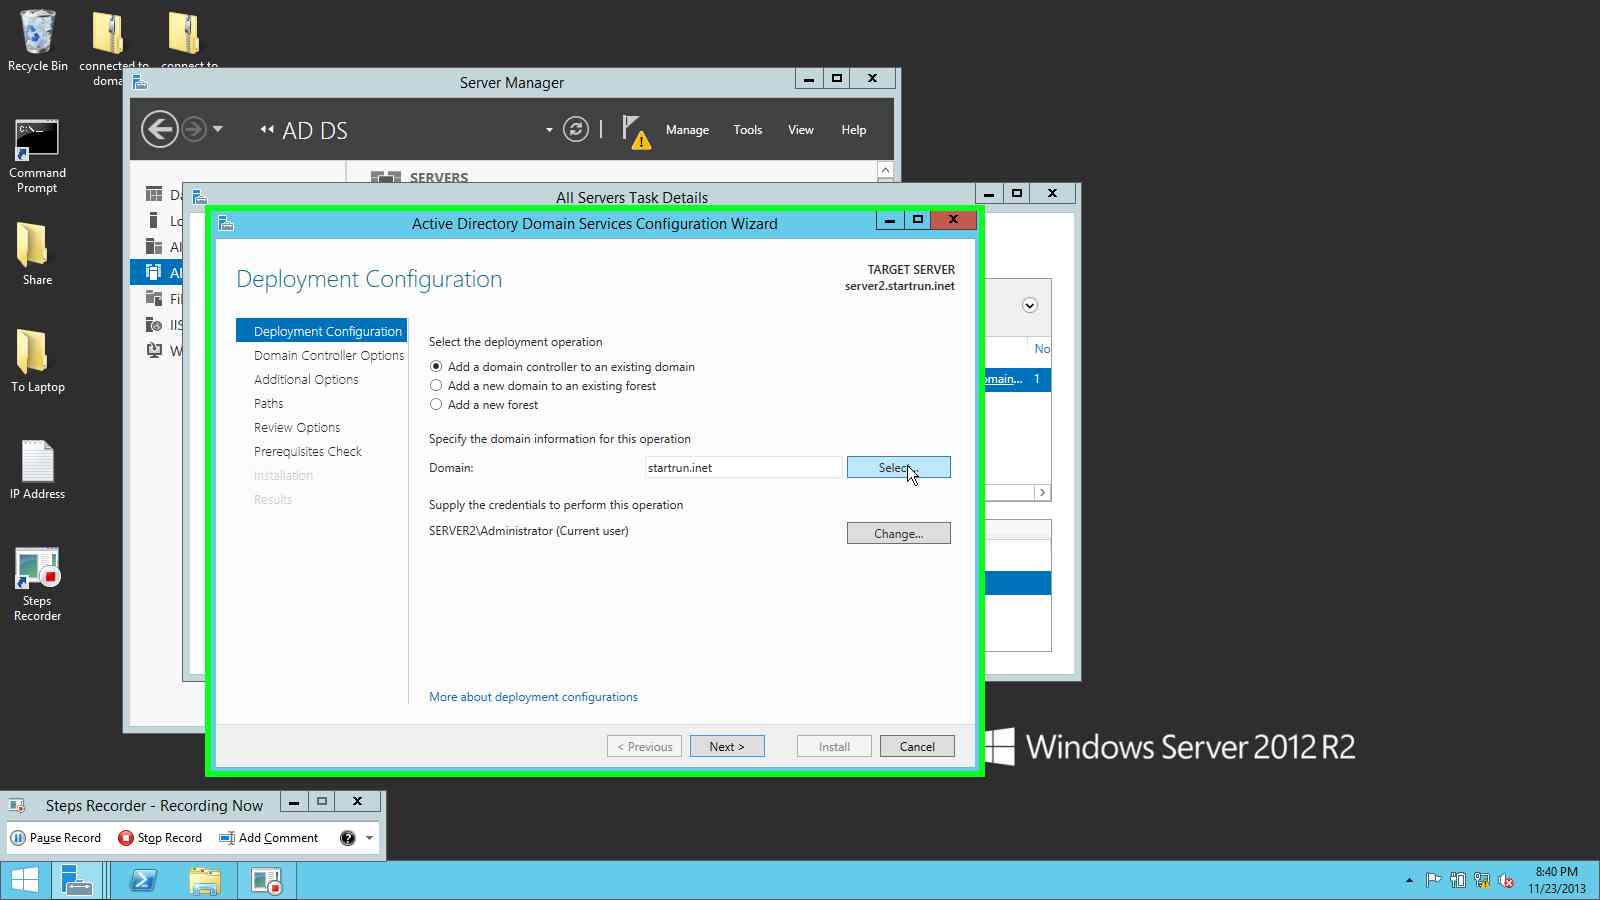
Once you have started the config this is what will be displayed, here you have 3 main choices, ADD A DOMAIN CONTROLLER TO AN EXISTING DOMAIN, ADD A NEW DOMAIN TO AN EXISTING FOREST AND ADD A NEW FOREST.

In this case we will be choosing: ADD A DOMAIN CONTROLLER TO AN EXISTING DOMAIN. This choice will allow us to create our second server as a domain controller within your currently configured and active domain.

After you have made your selection if you have done the above steps correctly and are connected to your current domain you should see it written in the text box, you will now want to skim down to the CHANGE box and click on it, you will then be presented with a pop up asking for your username and password.


Here you will enter the USERNAME and PASSWORD of your currently configured domain and click OK.

Your credentials will be activated and you will now be able to continue the configuration process by clicking NEXT.


You will now be able to configure your DOMAIN CONTROLLER OPTIONS, here you will be selecting DNS and GLOBAL CATALOG, this will create your GLOBAL CATALOG server settings.

Enter your desired password and click NEXT.

The next page that appears has your DNS options you will once again click NEXT.


The next step is important as you will now select your main domain controller to do REPLICATION, you will navigate to the drop down box and select your main domain controller server and click NEXT.


Here you will be asked to select where the DESTINATIONS should be set, i recommend changing the destination of your LOG FILES to a NAS or other storage device for safe keeping.

Make your desired setting and select NEXT.


 The main configuration has been completed now, on this window just check you settings to make sure they are correct and click NEXT.


We have now arrived to our final step, clicking INSTALL and waiting for the server to install and reboot.

Once you have been rebooted log in with your administrators username and password and Enjoy!

Saturday 23 November 2013

Connecting Windows / Server 2012 R2 to a domain

Today we will be looking at connecting you Server 2012 or Windows 7 & and up machines to your active Domain.

Firstly check your IP address and make sure it is statically set within your network, also make sure your DNS IP is set to your AD DS SERVER IP Address.

After those settings have been verified and set you can now navigate to your system properties, this is done by right clicking on MY COMPUTER or THIS PC and select PROPERTIES.


System setting will now pop up and you can navigate down to computer name, domain, and workgroup settings and click on CHANGE SETTINGS to the right hand side.

You will now be presented with a pop up displaying your current computer name, and workgroup. Here you will want to select CHANGE.


Once you have selected change, The window will change and allow you to make your desired settings. Here we want to select the DOMAIN radio button and type in out desired domain name. Followed by OK. as soon as you have clicked ok you will be presented with a new pop up asking for a username and password.


The username and password that needs to be entered is that of the DOMAIN.

Once you have entered the username and password properly click OK. Once the username and password has been accepted it all easy from here on.

You will now be prompted with two pop up welcoming you to your DOMAIN, click ok on both and you will be directed to the final window.


Once this window has opened click close and you will asked to restart your computer, once your computer has been restarted you will be prompted to log into your domain.

The hard part has now been completed and you can go ahead and check that your settings are correct.


You may use the following methods: Network and Sharing Center, System as well as network settings.

 That's IT.  Congrats! and Enjoy!

Setting up IP reservations with DHCP server 2012

Today we will be setting up IP Reservations using Server 2012. This is not as difficult as you may think.

Firstly we will be heading to SERVER MANAGER.


At the server manager interface, slect your DHCP SERVER and right click on your displayed server and navigate to DHCP MANAGER that is where the magic is created.


When the DHCP MANAGER console pops up, click the server drop down and then IPv4 drop down, if your DHCP server is configured you should see you SCOPE folder, if you do not have you DHCP server configured then you may go back to my previous posts and follow my instructions on setting up you DHCP SERVER.

Now Click on the scope drop down bock and select Reservations, after selecting reservations right click and select NEW RESERVATION....


Here you will require the MAC address of the device you will to have the assigned IP.

This is a very easy configuration, just fill in the name, IP, MAC address which is very important and description and select Add.

Your new RESERVATION has now been created!

Now to test this on the machine you have chosen.

Firstly you will want to check that the computer is set to DHCP or if it has a STATIC IP assigned to it.

Open up your command prompt (CMD) and type in ipconfig /all. this will display your adapter config.


Looking at this config tells us the information set to your NIC (network interface card).

if you look under your Ethernet adapter you can see DHCP Enabled........yes

This tells us DHCP is enabled.

Now type in ipconfig /release and as soon as this is done type in ipconfig /renew, these commands will will reset you NIC and grab an IP in this case it will contact the DHCP server and the DHCP server will give it the reserved ip assigned to it MAC address. Enjoy!